Follow Me On Social Media!
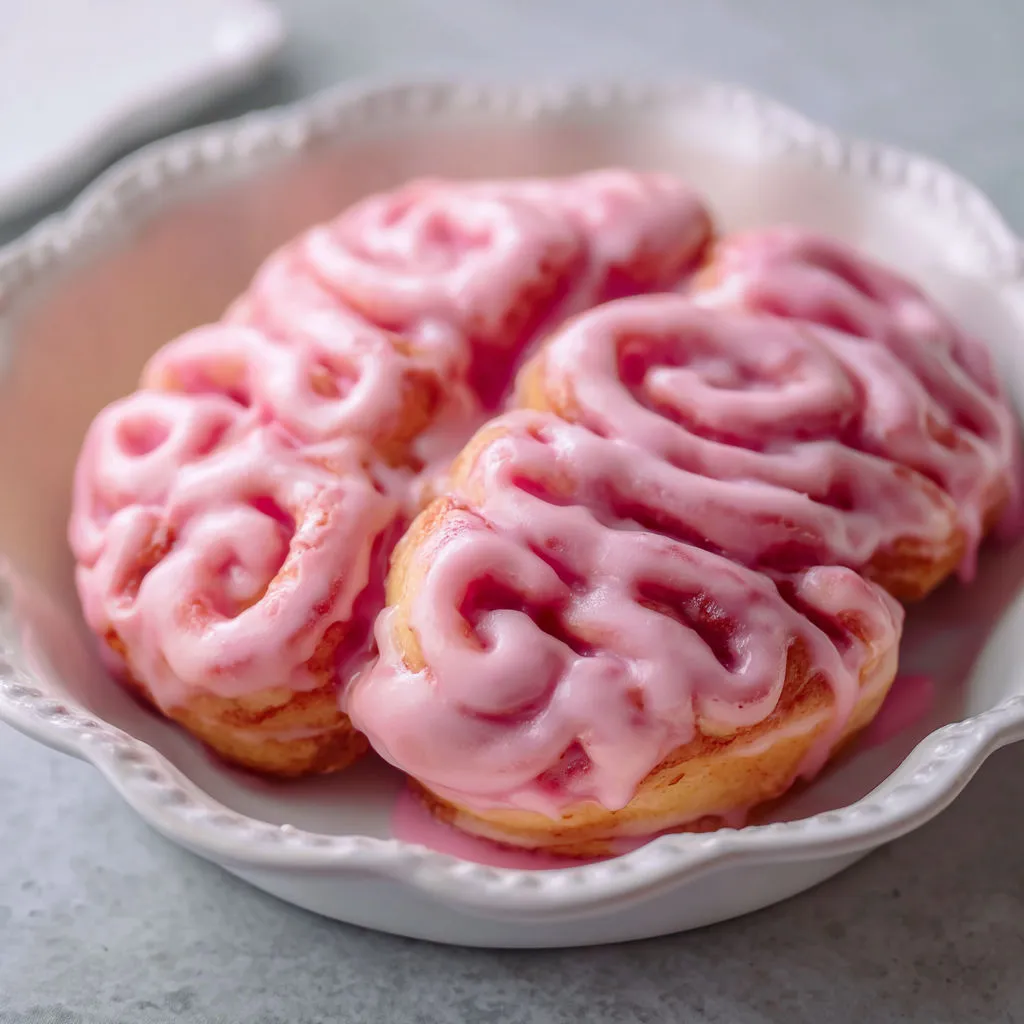
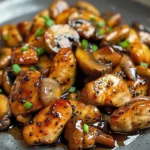
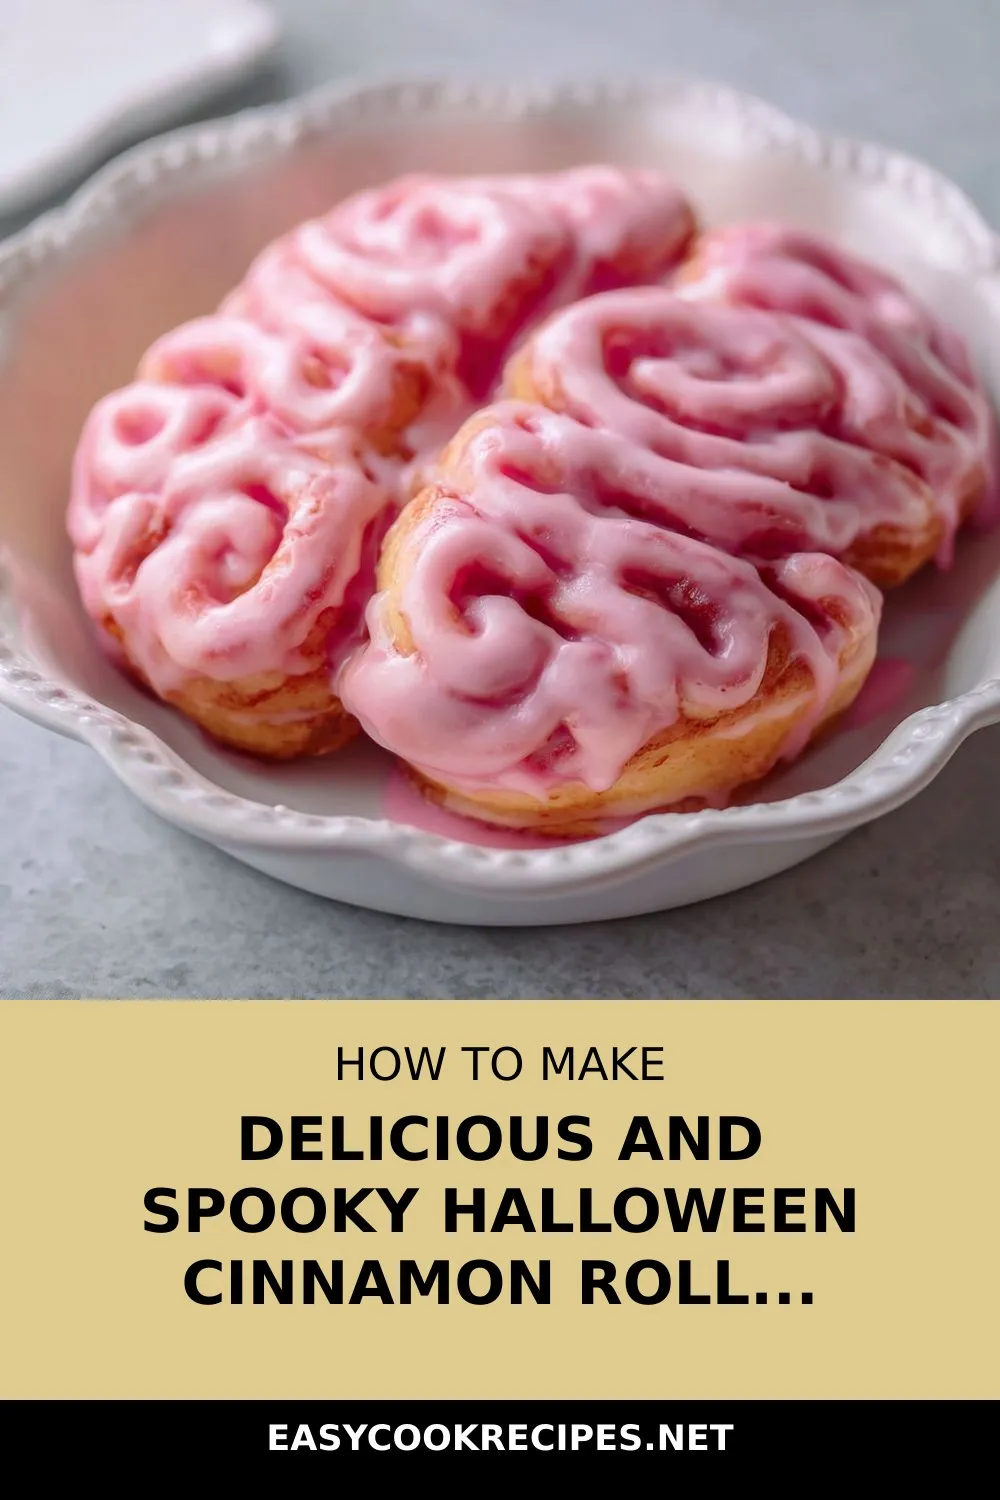
Sink your teeth into a spooky yet scrumptious delight with this Cinnamon Roll Brains Treat recipe. Picture warm cinnamon rolls twisted and baked to resemble brains, complete with a gory red icing that adds the perfect touch of Halloween fun. Whether you’re hosting a themed party or just looking to surprise your family, this creative twist on a classic treat is sure to impress.
I remember the first time I made these Cinnamon Roll Brains Treat for my family’s Halloween bash – the reactions were priceless! The brains may look eerie, but one bite reveals the familiar and comforting taste of gooey cinnamon rolls. It’s a playful dish that not only sparks conversation but also satisfies everyone’s sweet tooth. With just a few simple ingredients like Pillsbury Grands cinnamon rolls and red food coloring, you can whip up a festive and delicious centerpiece that will have everyone coming back for more.
Quick Benefits
- Makes a fun and unique themed centerpiece for October gatherings and parties
- Easy and quick to prepare, perfect for feeding a hungry crowd with minimal fuss
- Can be customized with different food coloring for various themed occasions
- Can be made ahead and frozen for convenient future use
Why You’ll Love This Delicious and Spooky Halloween Cinnamon Roll Brains Recipe Recipe
- Perfect Halloween Treat: Ideal for Halloween gatherings and parties, this recipe adds a spooky twist to a classic cinnamon roll, making it a perfect centerpiece for any October celebration.
- Easy to Make: Quick to prepare with minimal fuss, this recipe is perfect for feeding a hungry crowd without spending hours in the kitchen.
- Fun and Interactive: The brain-shaped cinnamon rolls are not only visually appealing but also fun to eat. Kids and adults alike will enjoy pulling apart the rolls or cutting them into wedges.
- Versatile and Customizable: You can customize the colors of the icing based on the theme of your party. Try different food colorings like pink, purple, or green for a unique twist.
- Make-Ahead Option: You can prepare the brains in advance by baking and freezing them, making it convenient for planning big events or parties.
- Memorable Experience: The reactions from guests when they see and taste these cinnamon roll brains are priceless. It’s a dish that will leave a lasting impression and create fun memories for everyone.
- Balanced Breakfast Dish: Pair the cinnamon roll brains with fresh fruit, hot apple cider, or spiced coffee for a well-rounded Halloween breakfast that will keep everyone satisfied.
Ingredients for Delicious and Spooky Halloween Cinnamon Roll Brains Recipe
Dough and filling
- 2 cans (17.5 oz each) Pillsbury Grands cinnamon rolls
Coating and color
- Red food coloring
- Non-stick baking spray
Pro Tips for Delicious and Spooky Halloween Cinnamon Roll Brains Recipe
Pro Tip 1: If you want to make your cinnamon roll brains even more festive, try using pink gel dye for a brighter finish. Adding candy eyeballs can also give them some extra spooky flair, especially if serving to kids. For a dairy-free option, use dairy-free baking ingredients for a friendly alternative that accommodates more guests.
Pro Tip 2: For a make-ahead option, bake and cool the unfrosted brains completely, then wrap tightly and freeze for up to one month. Thaw at room temperature before warming in a low oven and adding the icing. This is a great strategy for planning ahead for a big event or class party, allowing you to enjoy these spooky treats with minimal stress.
Pro Tip 3: While store-bought cinnamon rolls are convenient, homemade dough can add a richer flavor to your cinnamon roll brains. When assembling the rolls in the baking dish, be sure to unroll the dough and fold pieces back and forth, leaving a gap down the center for that distinctive brain shape. Remember to add red food coloring gradually until you achieve your desired shade and consider cutting into wedges or letting guests pull apart the rolls by hand for a fun presentation at gatherings.
How to Make Delicious and Spooky Halloween Cinnamon Roll Brains Recipe
Step 1: Prepare dough and oven
Remove the cinnamon roll dough from both cans, setting aside the icing. Preheat the oven to 350°F (175°C).
Step 2: Shape cinnamon roll brains
Unroll each cinnamon roll almost to the center, keeping a spiral shape. Coat a 10-inch round casserole dish with non-stick spray. Place half of the dough in folds on one side of the dish and the remaining dough on the other side, leaving a 1/2-inch gap down the center.
Step 3: Bake
Bake for 30 minutes or until the top is golden brown and the dough is fully cooked.
Step 4: Color and serve
Mix reserved icing with a drop of red food coloring in a medium bowl to make a pink color. Spread over the baked cinnamon roll casserole using a butter knife. Cut into wedges to serve or allow guests to pull apart portions with a fork.
📌 Pin for later!
Storage Tips
Once you have prepared the cinnamon roll brains treat, it’s important to store any leftovers properly to maintain freshness. To store the finished dish, tightly wrap the leftover brains or place them in an airtight container. Store them at room temperature for up to two days. For optimal flavor and texture, consider briefly reheating individual portions in the microwave for about ten seconds before serving. If you plan to make the cinnamon roll brains ahead of time, you can store the baked and uniced rolls for one day, then glaze them right before serving for the freshest results.
For longer storage or if you want to prepare the dish in advance, you can freeze the unfrosted brains for up to one month. Simply wrap them tightly and freeze, then thaw at room temperature before warming them in a low oven and adding the icing. This make-ahead option is perfect for planning ahead for a big event, party, or even just to have a quick treat on hand. Whether serving for Halloween gatherings or any occasion, proper storage ensures your cinnamon roll brains remain delicious and ready to enjoy.
Ingredient Substitutions
If you cannot find Pillsbury Grands cinnamon rolls, you can use regular-sized cinnamon rolls, but note that the final brain shape may be smaller. To enhance the color impact, consider using pink gel dye instead of red food coloring for a brighter finish. For guests with dairy restrictions, opt for dairy-free baking spray and icing to make the recipe more inclusive.
If you want to add a tangy twist to the icing, incorporate a spoonful of softened cream cheese before coloring it with food dye. Additionally, consider experimenting with different food coloring combinations like purple and green for a mad scientist-themed party. Remember, you can always make the brains ahead of time by baking, cooling, and freezing them unfrosted for up to a month, then thawing and warming before adding the icing when needed.
Serving Suggestions
To elevate the presentation of your cinnamon roll brains, consider arranging them on a platter in a “brain-like” shape, with the individual rolls strategically placed to resemble the convolutions of a brain. Drizzle the red-tinted icing in a zigzag pattern across the rolls to enhance the spooky effect. For an added touch, sprinkle crushed pecans or almonds on top to mimic the texture of a real brain, adding a crunchy element to each bite.
Another fun serving suggestion is to create a “brain buffet” where guests can customize their cinnamon roll brains with a variety of toppings. Set out bowls of mini chocolate chips, shredded coconut, chopped nuts, and colorful sprinkles for guests to sprinkle over their rolls before indulging. This interactive and creative setup will not only add a festive touch to your Halloween spread but also allow everyone to personalize their treats according to their taste preferences.
FAQs for Delicious and Spooky Halloween Cinnamon Roll Brains Recipe
Can I use homemade dough instead of store-bought for this recipe?
Yes, homemade dough works well and may add a richer flavor, though store-bought saves time.
How should I create the brain shape when preparing the cinnamon rolls?
Unroll the dough and fold pieces back and forth in the baking dish, leaving a gap down the center for definition.
What type of food coloring should I use for the red icing?
Red gel or liquid food coloring both work—add a little at a time to reach your desired shade.
How should I serve the cinnamon roll brains for a fun presentation at gatherings?
Cut into wedges or let guests pull it apart by hand for a fun presentation at gatherings.
Conclusion
As you bring this delightful Cinnamon Roll Brains Treat to life in your kitchen, remember that the joy of creating whimsical and delicious treats for your loved ones is truly special. Whether you’re hosting a Halloween party, surprising your family with a spooky breakfast, or simply indulging in some festive baking, this recipe is sure to bring smiles and laughter to all who enjoy it.
The versatility of this recipe allows you to get creative with colors, flavors, and serving suggestions, making it a perfect addition to any occasion beyond just Halloween. So, embrace the fun and playfulness of this Cinnamon Roll Brains Treat, and watch as it becomes a memorable favorite in your household for years to come. Happy baking, and may your kitchen be filled with the sweet aroma of cinnamon and joy!
📌 Pin for later!
Delicious and Spooky Halloween Cinnamon Roll Brains Recipe
“Transform traditional cinnamon rolls into spooky Cinnamon Roll Brains with red icing for a playful Halloween brunch centerpiece.”
Prep Time15 min
Cook Time30 min
Total Time45 min
CuisineAmerican
Skill LevelEasy
Servings8 Servings (1 casserole (8 servings))
Ingredients
Dough and filling
- 2 cans (17.5 oz each) Pillsbury Grands cinnamon rolls
Coating and color
- Red food coloring
- Non-stick baking spray
Instructions
-
Prepare dough and oven: Remove the cinnamon roll dough from both cans, setting aside the icing. Preheat the oven to 350°F (175°C).
-
Shape cinnamon roll brains: Unroll each cinnamon roll almost to the center, keeping a spiral shape. Coat a 10-inch round casserole dish with non-stick spray. Place half of the dough in folds on one side of the dish and the remaining dough on the other side, leaving a 1/2-inch gap down the center.
-
Bake: Bake for 30 minutes or until the top is golden brown and the dough is fully cooked.
-
Color and serve: Mix reserved icing with a drop of red food coloring in a medium bowl to make a pink color. Spread over the baked cinnamon roll casserole using a butter knife. Cut into wedges to serve or allow guests to pull apart portions with a fork.